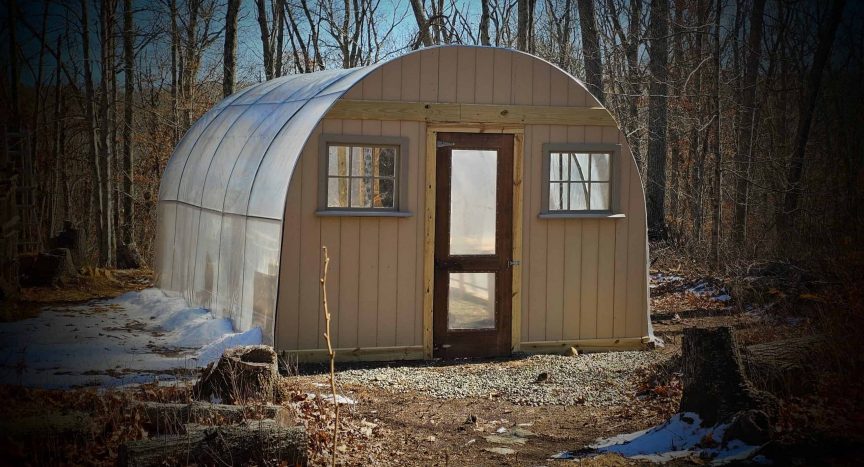
Step -by -step guide to building a Hoop house
The construction of our Hoop House greenhouse was a process of combining creativity, practicality and many practical work. Here's how we together, step by step:
1. Preparation of page
Before we started gathering Hoop's house, we selected a level area with good sunlight exposure. The preparation of the site included waste cleaning, flattening the soil and ensuring that there was sufficient space for the greenhouse trail.
2. The anchoring of the frame
The reburied metal carport frame was the backbone of our greenhouse. To anchor it safely, we put 4x4s directly on the ground. The frame was glued to 4x4s with bold brackets and screws, ensuring that it would not be moved or shaken in high winds. 4x4s not only stabilized the structure, but also provided a solid foundation to attach other ingredients such as wooden edges.
3. Construction of wooden edges
We built the wooden edges using the finished side wall of the plywood we bought from the Home Depot. This side wall gave the greenhouse a clean, polished appearance as it added strength and insulation to the structure. Wooden skirts were a critical part of strengthening the general greenhouse and creating safe openings for doors and windows. Process included:
-
- Frating each end with vertical and horizontal wood support to create a solid side wall base.
- Attached side wall of the finished plywood to the frame, ensuring that everything was firmly secured and weather resistant.
- Creating cuttings for front and rear doors, as well as small windows on the front for additional ventilation.
- Anchoring the wooden edges safely in the carport frame and 4x4s for additional stability.
The plywood point not only increased consistency, but also made the greenhouse look more professional and cohesive. It was an excellent investment that enhanced both functionality and appearance of structure.
4. Installation of doors
For the front door, we used a heavy -duty door door we had saved, adjusting it by replacing greenhouse plastic screens. This was an easy and cost -effective solution that added a professional appearance. The rear was dual doors, tailored to the wood and covered with the same greenhouse plastic. These allow a wider access when necessary, especially for bringing supplies or equipment.
5. Cover the structure with plastic
We have used 6mil greenhouse plastic from the farm plastic supply to cover the carport frame. This plastic is durable, UV resistant and is estimated to last up to four years, making it a great choice for the project. To ensure that he was tired, evenly distributed, and securely fixed, we used a canal and wire ankle system by Wiggle by Bootstrap Farmer. Here's how we did:
-
- The plastic was carefully draped on the carport frame, ensuring that it was positioned evenly and without wrinkles.
- The channel lock was installed along the edges of the frame, and the wiggle wire was used to provide plastic tightly in place. This system made it easy to adjust the plastic as needed and provided a strong, weather -resistant retention.
- Around the wooden edges, we cut and place the plastic exactly, providing it with the channel lock and wiggle wire for a professional and bold finish.
The wiggle canal and wire wire system was an investment, but it is invaluable to keep plastic safe, even during strong winds. It is a simple, effective solution that ensures that the coverage stays in place for the years ahead.
6. Adding ventilation
Ventilation is essential for regulating temperature and humidity inside the greenhouse. We installed a exhaust fan with time of heat on one of the wooden ends. It automatically switches on when the temperature rises, ensuring that the plants inside will not heat up. This is an addition that I recommend a lot for each greenhouse.
7. Preparation for the future
As the greenhouse is already operational, we have plans to improve it further:
-
- Adding to the floor of crushed stone for improved drainage and easier cleaning.
- Installing an oil heater to maintain warmth during the coldest nights, especially for the starting and overload plants of the seed.